Well folks, I’ve not been able to blog for sometime as I was caught up with work. But fear not, these past 2 months have given me enough subject material for multiple blog posts. Let me start off with one regarding setting up SQL Server for bulk inserts from a network file share when constrained delegation is setup in Active Directory.
For SQL Server folks out there, I don’t expect you to know about Delegation let alone Constrained vs. Unconstrained.
Q&A
Q: What is Delegation?
A: A client connected to an instance of SQL Server can connect to another instance of SQL Server or another machine by forwarding the credentials of an authenticated Windows user.E.g. Domain\User1 on Client1 connects to –> SQL Server SQL1 and accesses a remote file on –> Server2, using his own credentials i.e. Domain\User1
It is the role of the SQL Server machine SQL1 to impersonate/delegate that user when communicating with Server2. For this to happen, the SQL Server has to be configured to allow delegation (in Active Directory).
Q: What is Constrained Delegation?
A: This feature allows administrators to specify exactly which services a server or a domain account can access when using an impersonated user’s security context. More on this later. If there is no such restriction configured, then it is called as unconstrained delegation, where every service for that user can perform impersonation aka delegation. It is a security best practice to perform constrained delegation as it reduces the surface area of any attacks.
Environment
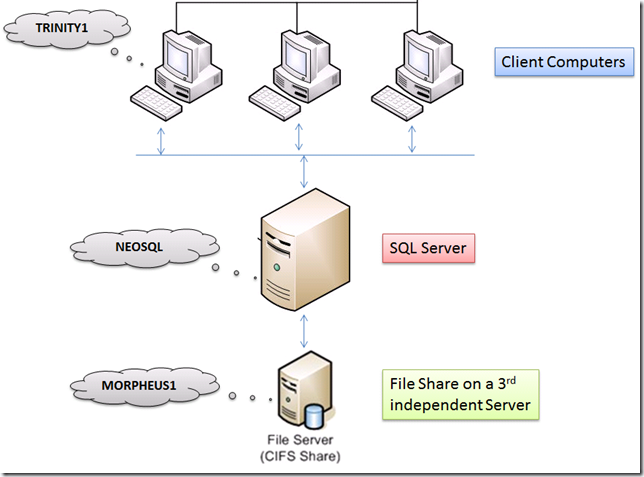
Here is a brief layout of the environment that I am going to use in this post as a reference.
This is a basic 3 machine architecture that is very common. Here are the various parties involved:-
- Client Computer – Windows PC/Workstation/Application Server: machine name TRINITY1, Client account Domain\appadmin
- SQL Server – Windows Server 2003+ running SQL Server 2005/2008/2008 R2 standalone instance: machine name NEOSQL, SQLSvc account Domain\sqladmin
- File Share on another Windows Server (basically a shared folder): machine name MORPHEUS1, where user Domain\appadmin has Full Control on the shared folder.
Scenario/Requirement
In an ideal scenario, here is how I want things to work. When a client application runs the SQL BULK INSERT command logged in as Domain\appadmin account to SQL Server, I want the same appadmin account to access the remote file share and read the data.
1. If a user uses a SQL Server login to connect to SQL, then the SQL Service account credentials are used to access the remote file share.
2. If a user uses a Windows account, then his own account is used to access the file share and for this to work successfully, delegation has to be configured.
BULK INSERT appdb.dbo.bulktbl
FROM ‘\\morpheus1\share\data.txt’
If not configured correctly then you will get this error when running the above bulk insert command.
Msg 4861, Level 16, State 1, Line 3
Cannot bulk load because the file "\\morpheus1\share\data.txt " could not be opened. Operating system error code 5(Access is denied.).
Configuring Unconstrained Delegation
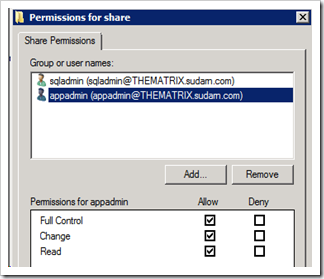
1. Configuring permissions on the shared folder on Morpheus1. As you can see the appadmin windows account has Full Control and the sqladmin account has Read/Write permission (if any sql login is going to be used, this is not mandatory).
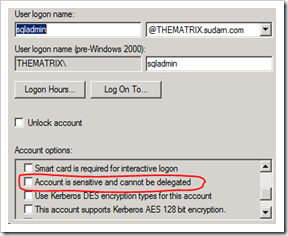
2. I am assuming that the SQL Server is running under the service account Domain\sqladmin. Login to the Domain Controller with Domain Admin rights and open up Active Directory Users and Computers MMC snap-in.
a. Make sure that the following is NOT checked.
b. The SQL Service account needs SPN’s (Service Principal Names) to be created before it can be configured for delegation. You can use the SetSPN.exe tool that is available with Windows SDK or sysinternals toolkit to create the SPN’s. This tool is also available bundled along with Windows Server 2008.
We need to create 4 SPN’s for the account running SQL Server service as shown below. (2 with netbios names and 2 with FQDN). Note: The command below is for a standalone default instance of SQL Server running on default port 1433. Please modify as applicable to your environment.
Setspn -A MSSQLSvc/neosql thematrix\sqladmin
Setspn -A MSSQLSvc/neosql:1433 thematrix\sqladmin
Setspn -A MSSQLSvc/neosql.thematrix.sudarn.com thematrix\sqladmin
Setspn -A MSSQLSvc/neosql.thematrix.sudarn.com:1433 thematrix\sqladminOnce done you can query the SPN’s using setspn.exe and it should list you these 4 SPN’s.
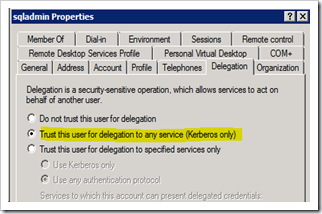
c. Switch to the Delegation Tab and select the radio button by Trust this computer for delegation to any service (Kerberos only). We are setting up unconstrained delegation if this option is chosen. If you do not see the Delegation tab available, then there was some issue with creating the SPN’s in step (b) listed above.
d. Next find the actual machine account in Active Directory for the SQL Server machine NEOSQL and set the computer account to be trusted for delegation, as we did above.
e. Next, we need to check the file server where the file we want to import is located, i.e. MORPHEUS1. We need to verify that this machine has the normal 2 HOST SPN’s registered.
This is required to use Kerberos for authentication. Delegation will not work without this, and you will receive an error otherwise. By default each machine should have 2 HOST SPN’s created for it.
3. On the SQL Server machine NEOSQL, open up the Local Security Policy by going to secpol.msc –> Computer Configuration\Windows Settings\Security Settings\Local Policies\User Rights Assignment, and add the sql account Domain\sqladmin to the following policies:
- Act as part of the operating system
- Impersonate a client after authentication
So far the configuration given above is for unconstrained delegation. We need to make sure that this setup works before we can configure constrained delegation. Once you are done till there, reboot the SQL Server machine (NEOSQL) and the file share machine (Morpheus1), so that all the changes we made in Active Directory are reflected when the machine starts up.
Testing
Make a test connection from the client machine (TRINITY1) using sqlcmd or SSMS. Open up another connection from SSMS and run the following query to find out if the connection from the client machine is using Kerberos authentication.
select b.spid, b.hostname, b.program_name, a.auth_scheme
from sys.dm_exec_connections a
inner join sys.sysprocesses b
on a.session_id = b.spid
The connection from the client machine should return KERBEROS. This is required for delegation to work. If it did, then you are good to run the bulk insert statement and it should work.
Configuring Constrained Delegation
So far so good. Now comes the part that is the crux of this blog post. If you were successful in getting things to work, then read on….
1. Open up Active Directory Users and Computers MMC snap-in with a Domain Admin account as before. Open up the Domain\sqladmin account and switch to the Delegation Tab.
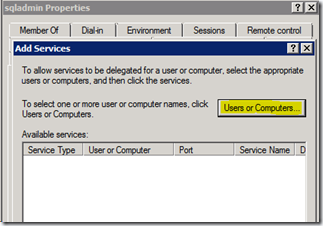
2. Choose the option “Trust this computer for delegation to specified services only”, select “Use any authentication protocol” and click on the “Add…” button.
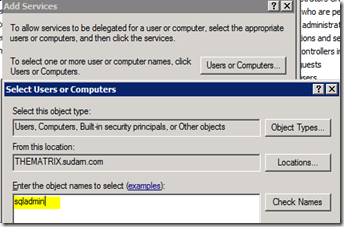
In the dialog to select the sqladmin account (or your account which runs the SQL service).
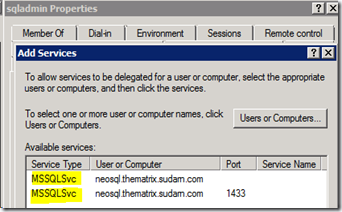
This should list the 2 SPN’s we have previously created for this account. Select both of them and click OK.
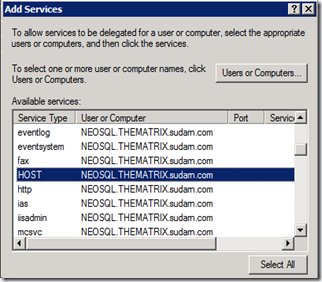
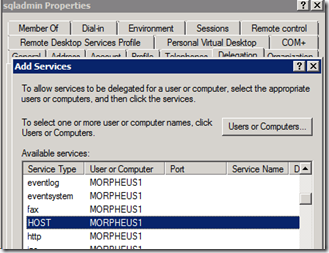
Click on the “Add…” button again and enter the SQL Server machine name (NEOSQL) and choose the HOST service.
Click on the “Add…” button again and enter the File Share machine name (MORPHEUS1) and choose the HOST Service. We are actually interested only in the CIFS and Protected Storage service. Choosing HOST will automatically choose these 2 services.
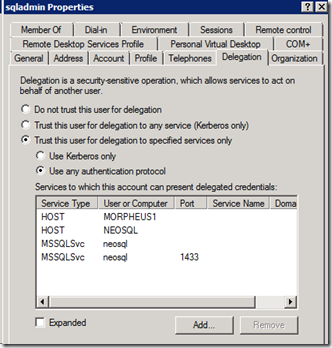
After adding all of these, this is how your final configuration for the sqladmin account will look like.
We need the SQLSvc account (Domain\sqladmin)and file share server to have CIFS service enabled for delegation because we are accessing a remote file share and it is the role of the CIFS Service (Common Internet File Share) to perform this. If we do not have CIFS (which comes when we added the HOST Service), then your account (Domain\appadmin) from the client machine (TRINITY1) will reach the file share server (MORPHEUS1) as NT AUTHORITY\ANONYMOUS LOGON and this will not have access and fail with 0x5 (Access is Denied).
I tested this by enabling auditing on the shared folder and saw this. This is a easy test to perform to check if delegation is working or not
When the bulk insert fails with access denied we will see this in the security event log of the file server (MORPHEUS1),
Log Name: Security
Source: Microsoft-Windows-Security-Auditing
Date: 12/20/2011 11:17:33 PM
Event ID: 4624
Task Category: Logon
Level: Information
Keywords: Audit Success
User: N/A
Computer: MORPHEUS1.THEMATRIX.sudarn.com
Description:
An account was successfully logged on.Subject:
Security ID: NULL SID
Account Name: –
Account Domain: –
Logon ID: 0x0Logon Type: 3
New Logon:
Security ID: ANONYMOUS LOGON
Account Name: ANONYMOUS LOGON
Account Domain: NT AUTHORITY
That’s all folks! Keep in mind that this configuration requires a good bit of handling with Active Directory and/or policies. Please work with your Domain Administrator while making these changes. As always, stay tuned for more… Cheers and a happy new 2012 to y’all!


